1

I get asked about swimming quite a bit, mainly whether it’s safe when you have diastasis recti, but I’m going to cover pregnancy as well as postnatal here, so I’ll start with that.

Swimming During Pregnancy


Swimming can provide relief from aches and pains often experienced during pregnancy, relieving the pressure of your bump by supporting it, and taking the strain off your back.

It’s also great for improving your circulation which is sometimes affected during pregnancy, because of all of the hormones running around your system.  The pressure of the water on your veins and arteries actually stimulates blood flow and can reduce swelling you may be experiencing, say in the feet or ankles.

A workout and relaxation all in one!


A trip to the pool also gives your muscles a great workout!  Water offers 12 times the resistance of air, and your deep abdominal muscles get in on the act too, as they help stabilise the pelvis in water.

The rhythmic action of the stroke can also be quite relaxing, as can the feeling of weightlessness.  For baby, the soft muffled sounds created by the water induce a feeling of calm and tranquility for him/her too.

Which stroke is best?

If you are experiencing any pelvic pain during pregnancy, I’d suggest that you avoid breast stroke leg action.  Even if you don’t suffer with SPD now, I’d be mindful of how you feel, and avoid kicking too hard/ agressively. Keep the kick narrow, and avoid a wide ‘froggy’ breast stroke kick.

I personally found freestyle/crawl a lot more comfrotable when pregnant, but I know not everyone is confident with this, and it can be quite tiring.

As a guide, on a scale of 1-10, you shouldn’t exert yourself above a 7 when pregnant. This means out of breath, but not uncomfortable: you should still be able to talk and hold a converstation (albeit a panting one)!

I’d also recommend buying a pair of goggles so you can swim with your head down, because this puts less pressure on your back.  Swimming with your head out of the water causes the pelvis to drop and accentuates the increased curve in the lumbar spine.

Swimming With Diastasis Recti


Ok, postnatal now. The question isn’t so much “is it safe”, as unless you have pelvic pain or a back problem, the risk of injury is low. It’s more can it worsen your diastasis, or prevent it from healing?

Firstly, people worry that being horizontal could put a downwards pressure on the abdominal wall. However water creates a hydrostatic pressure, and when you’re horizontal in the water the pressure from the water below (which helps give you buoyancy) will apply some compression to the abdomen.

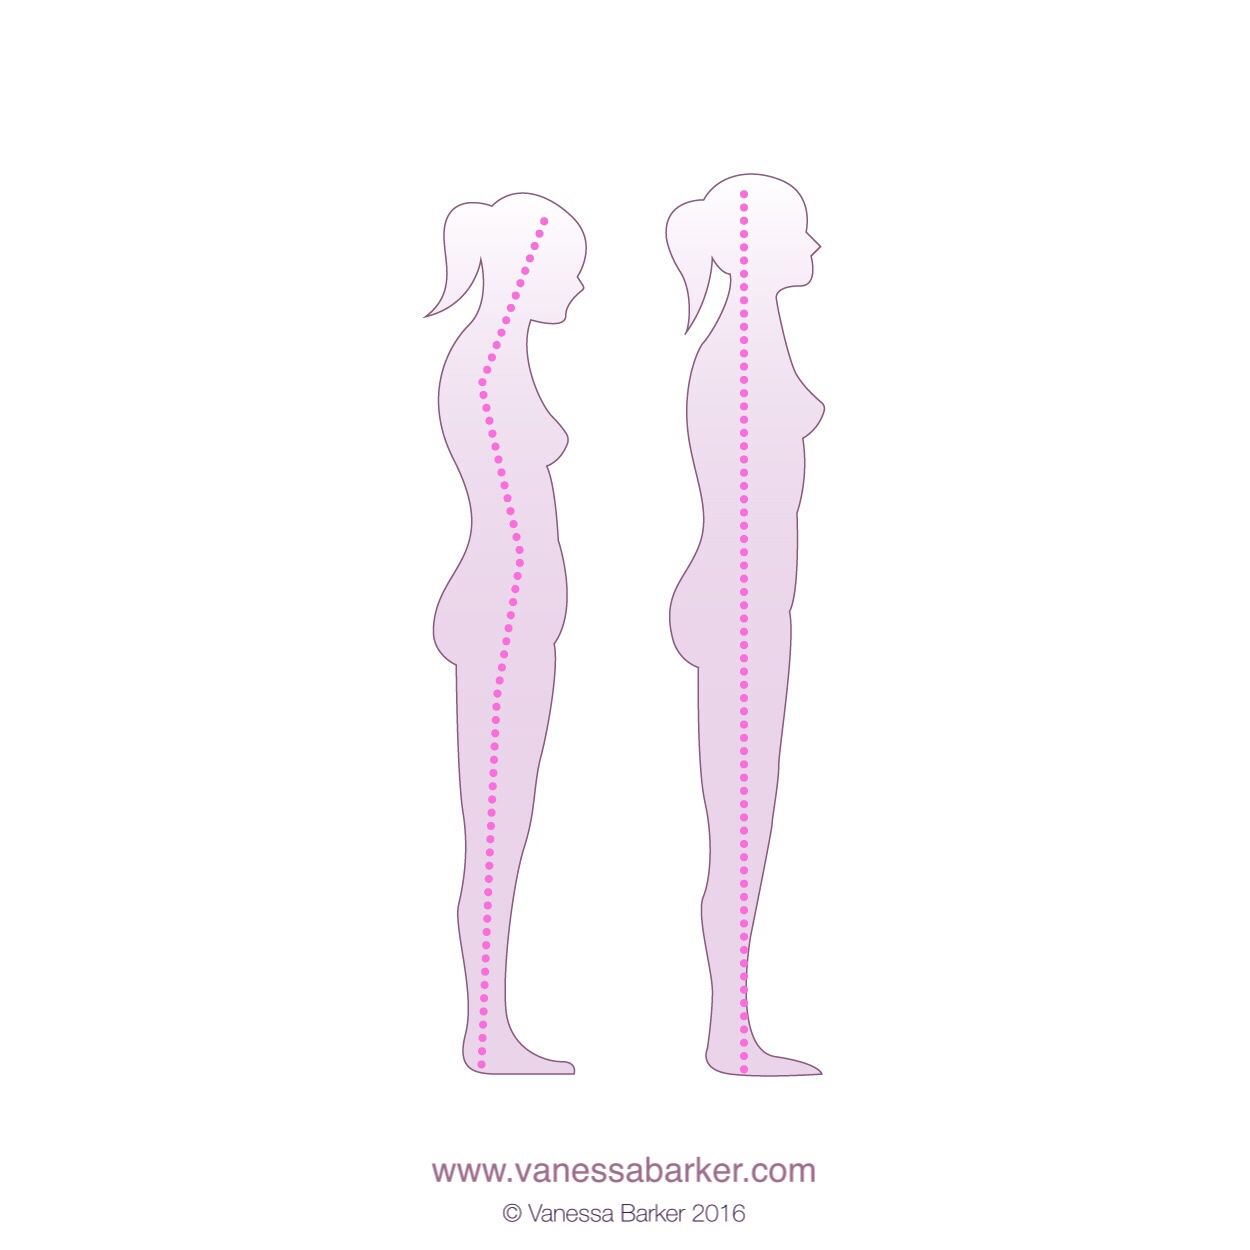
There’s more to consider though, and your alignment in the water (or your technique) is really important too. If you have your head out of the water the whole time, then you’re arching your back (which may be sore) and stretching your abs. It flares out the ribs, which I see a lot in postnatal mums and you’re better off avoiding.

Let’s look at the 2 most popular strokes.
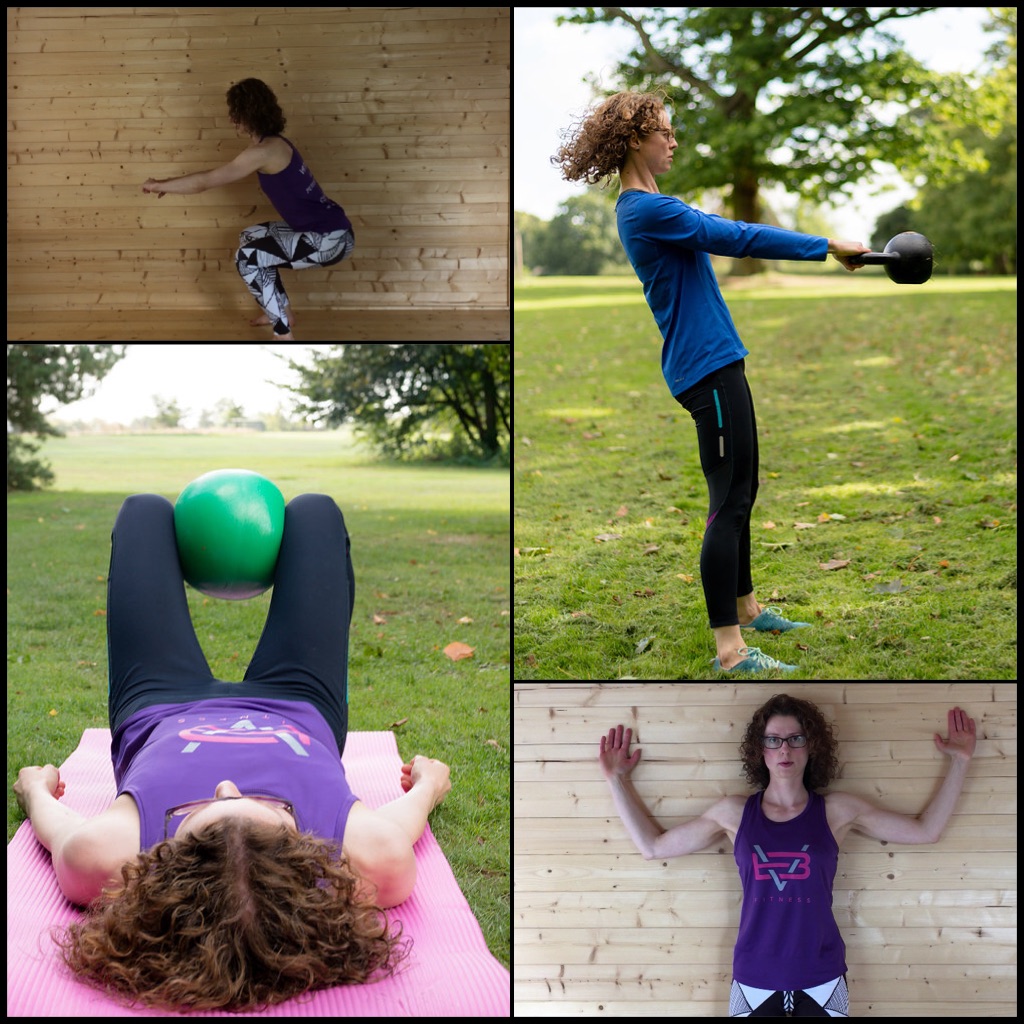
Breast Stroke

So if you’re going to swim breast stroke, head down (as in looking at the swimming pool floor) and in the water with each stroke! I can’t really go into technique much here, but if you watch Michael Phelps here, he actually keeps his back fairly neutral. Most of us don’t manage quite such a neat stroke though!

Also- if you still have any pelvic pain, the points above apply and I’d avoid breast stroke.

Front Crawl

I still find there can still be a flaring of the ribs, as when I swim in busy lanes I have to look up to see if anyone is in front of me. This arches my back a little and flares my ribs. I have to be VERY mindful of my technique to avoid it- again keep your gaze on the pool floor. Let’s look at Phelps again (may as well learn from the best!) and see how flat his body and spine is.

Keeping your hips up and kicking from the hips, using the butt muscles (instead of kicking from the knees) helps too, with both speed and glute strength (important for a healthy pelvic floor).

I also have to focus to keep my shoulders relaxed, and not up around my ears! Tight neck/ shoulders is common with my clients, so you don’t want to make that worse.

Core Strength and Shoulder Mobility


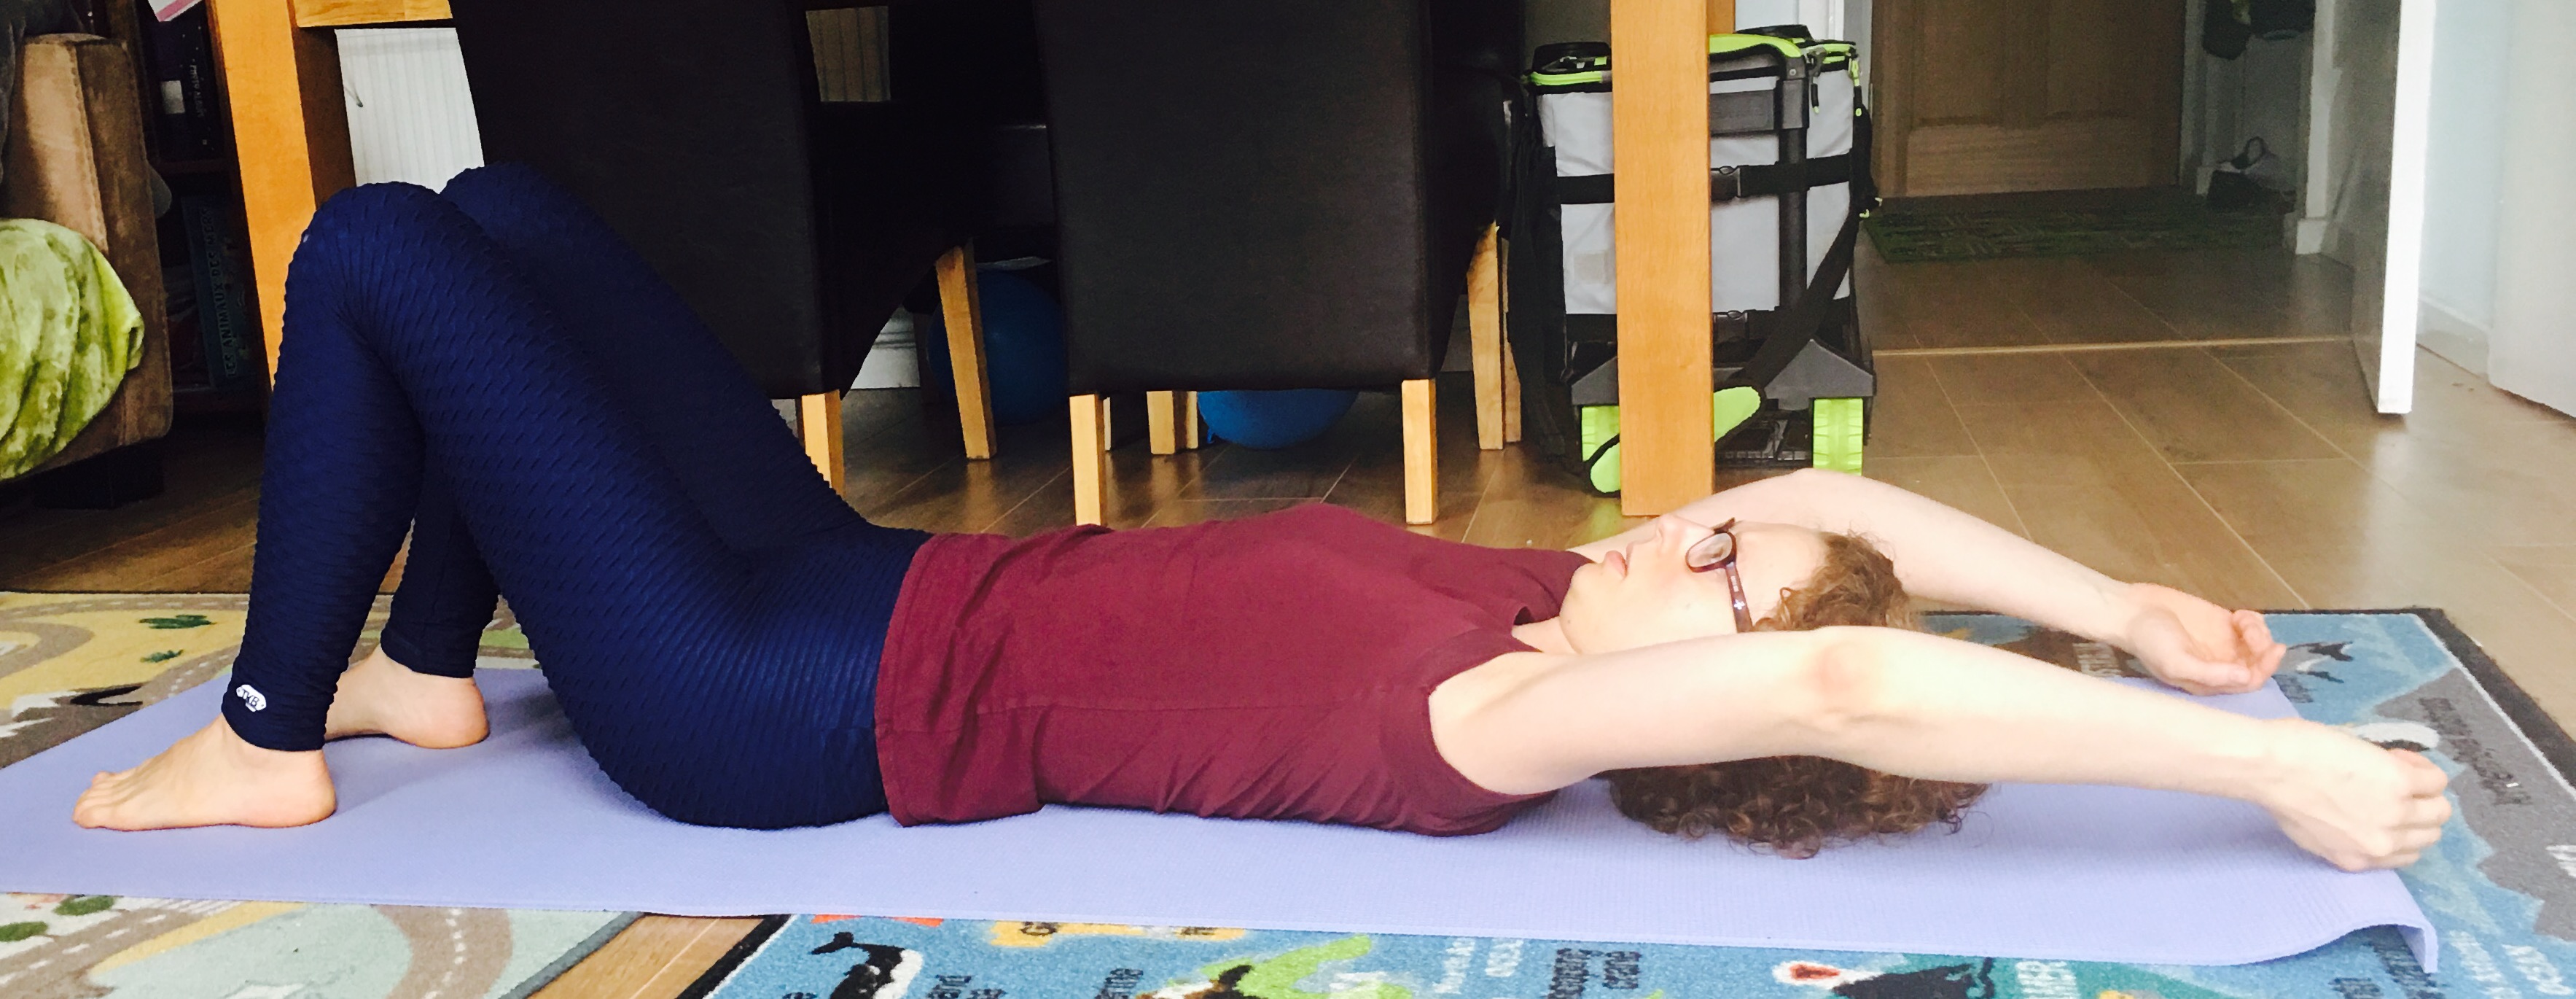
You also need to consider your flexibility. Lie down and reach your arms in the air.

swimming postnatal exercise watford
Then let them fall behind you.
swimming postnatal diastasis watford

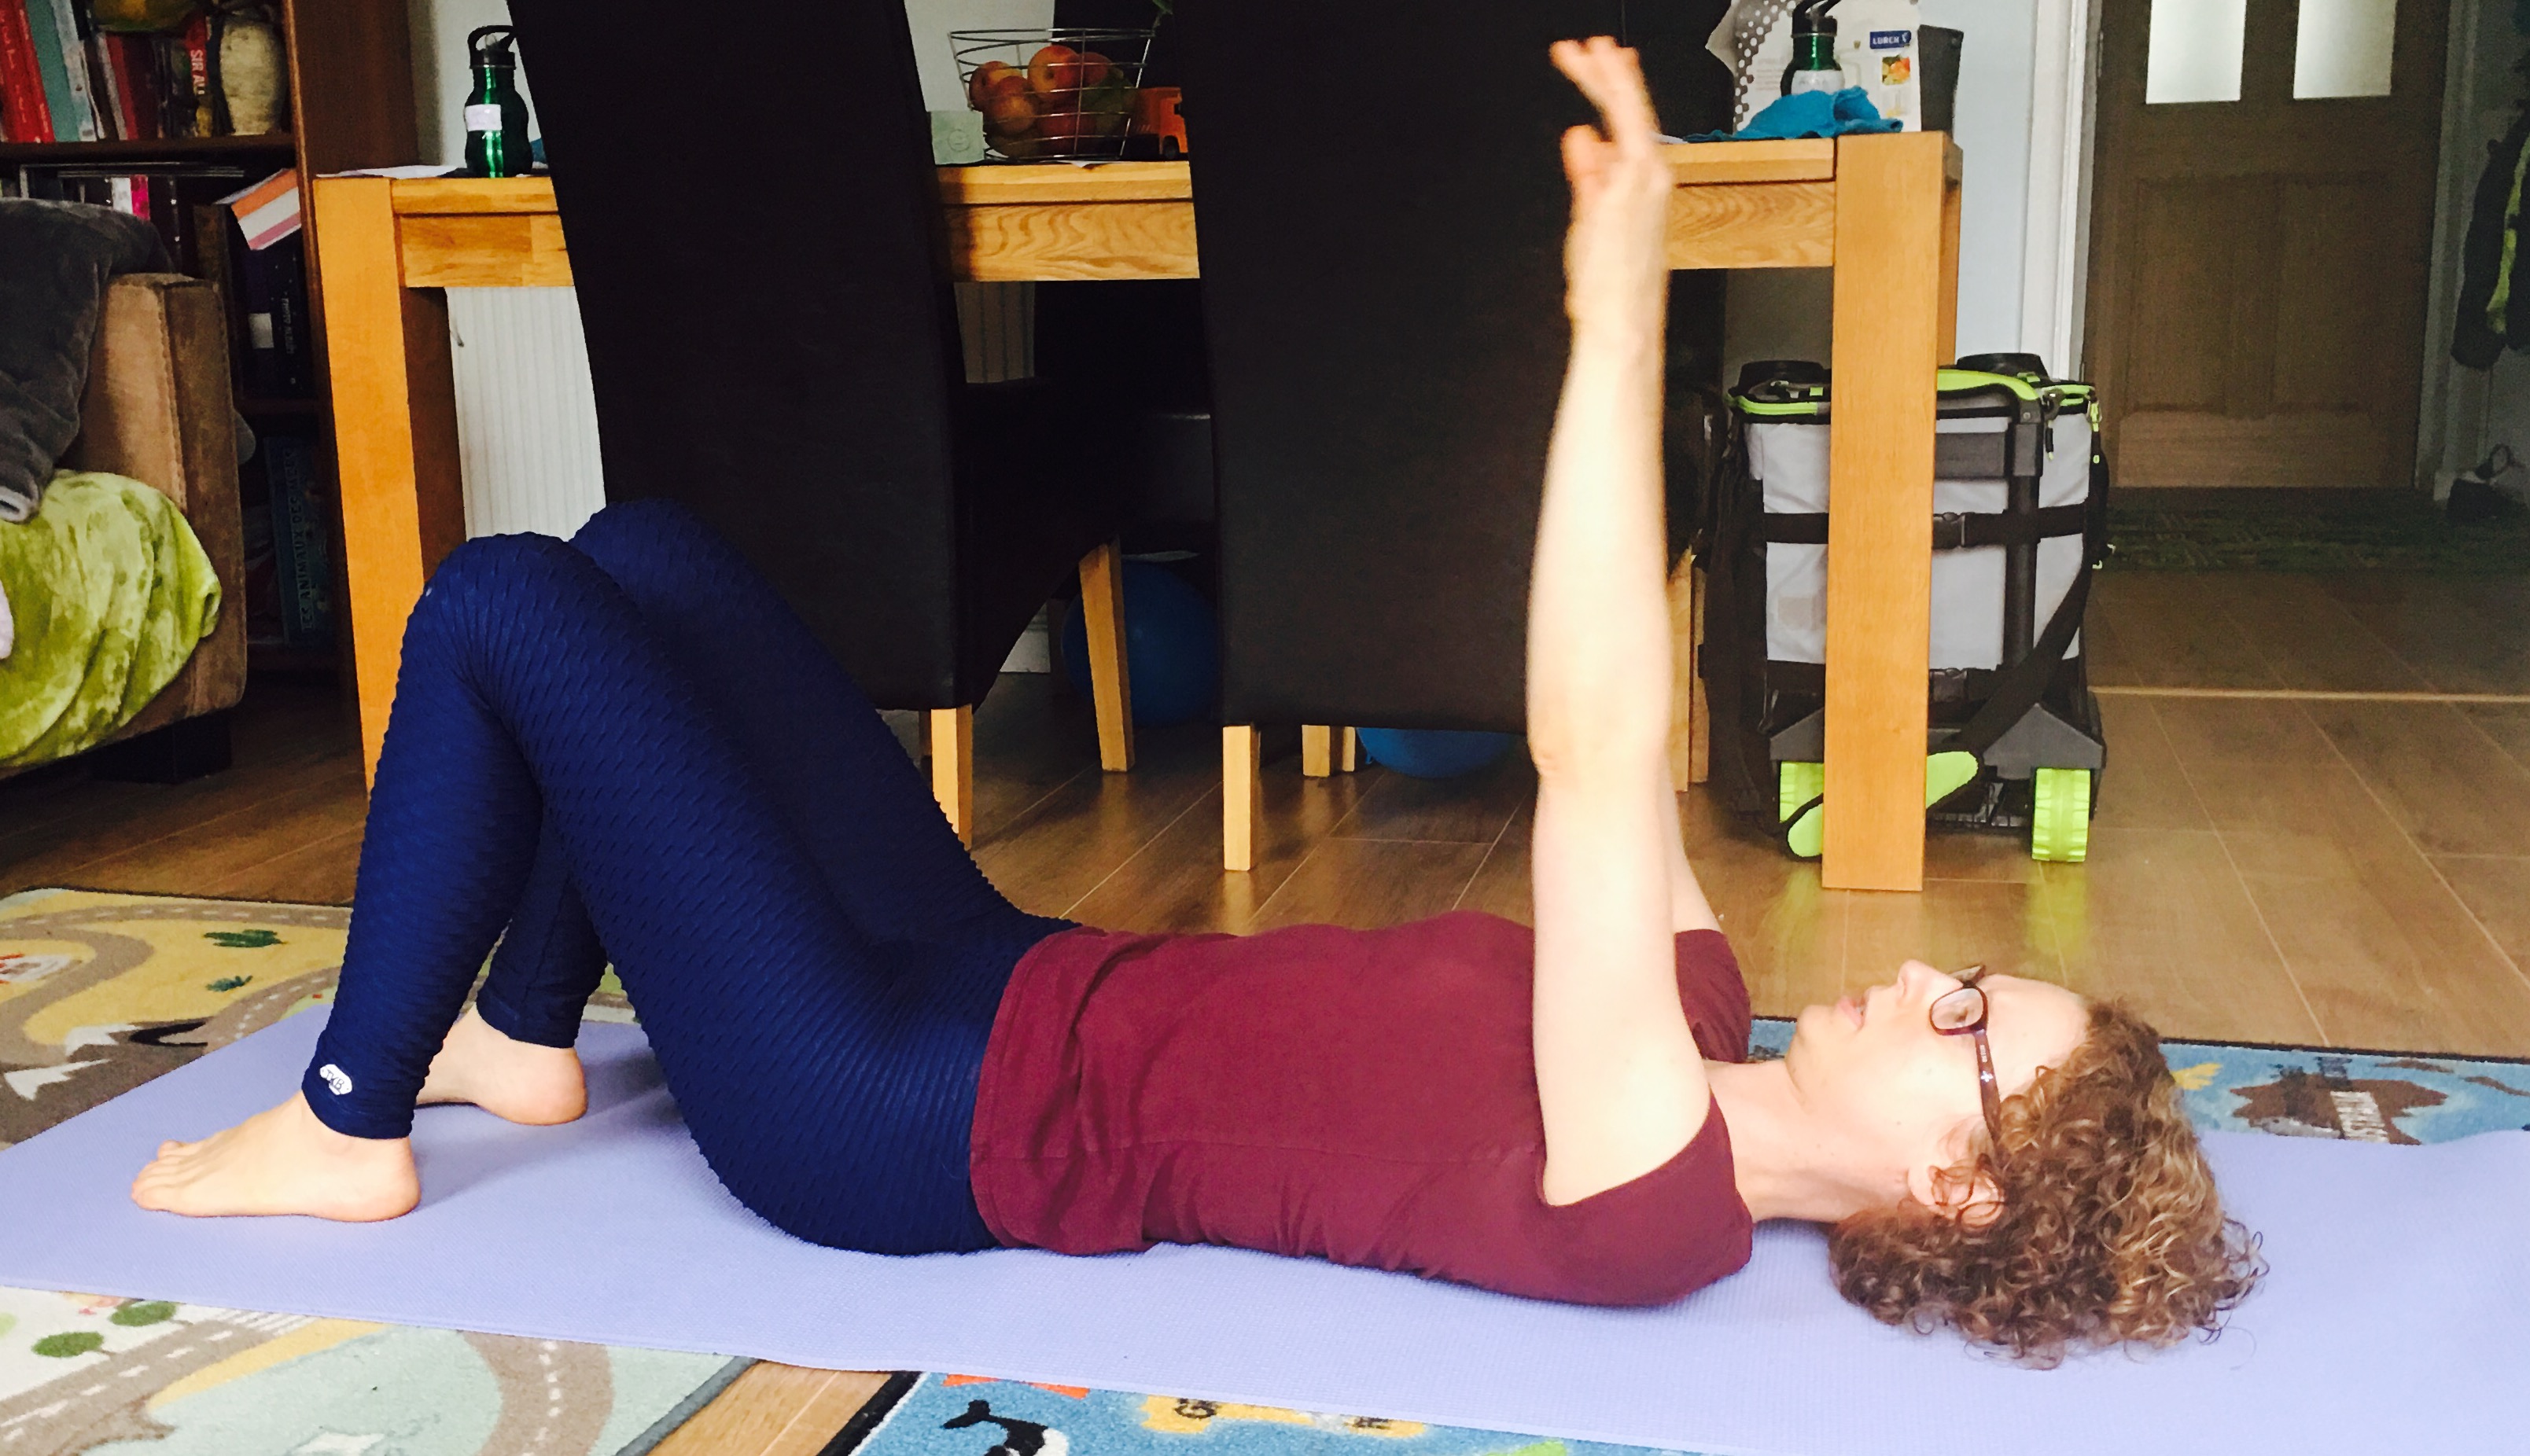
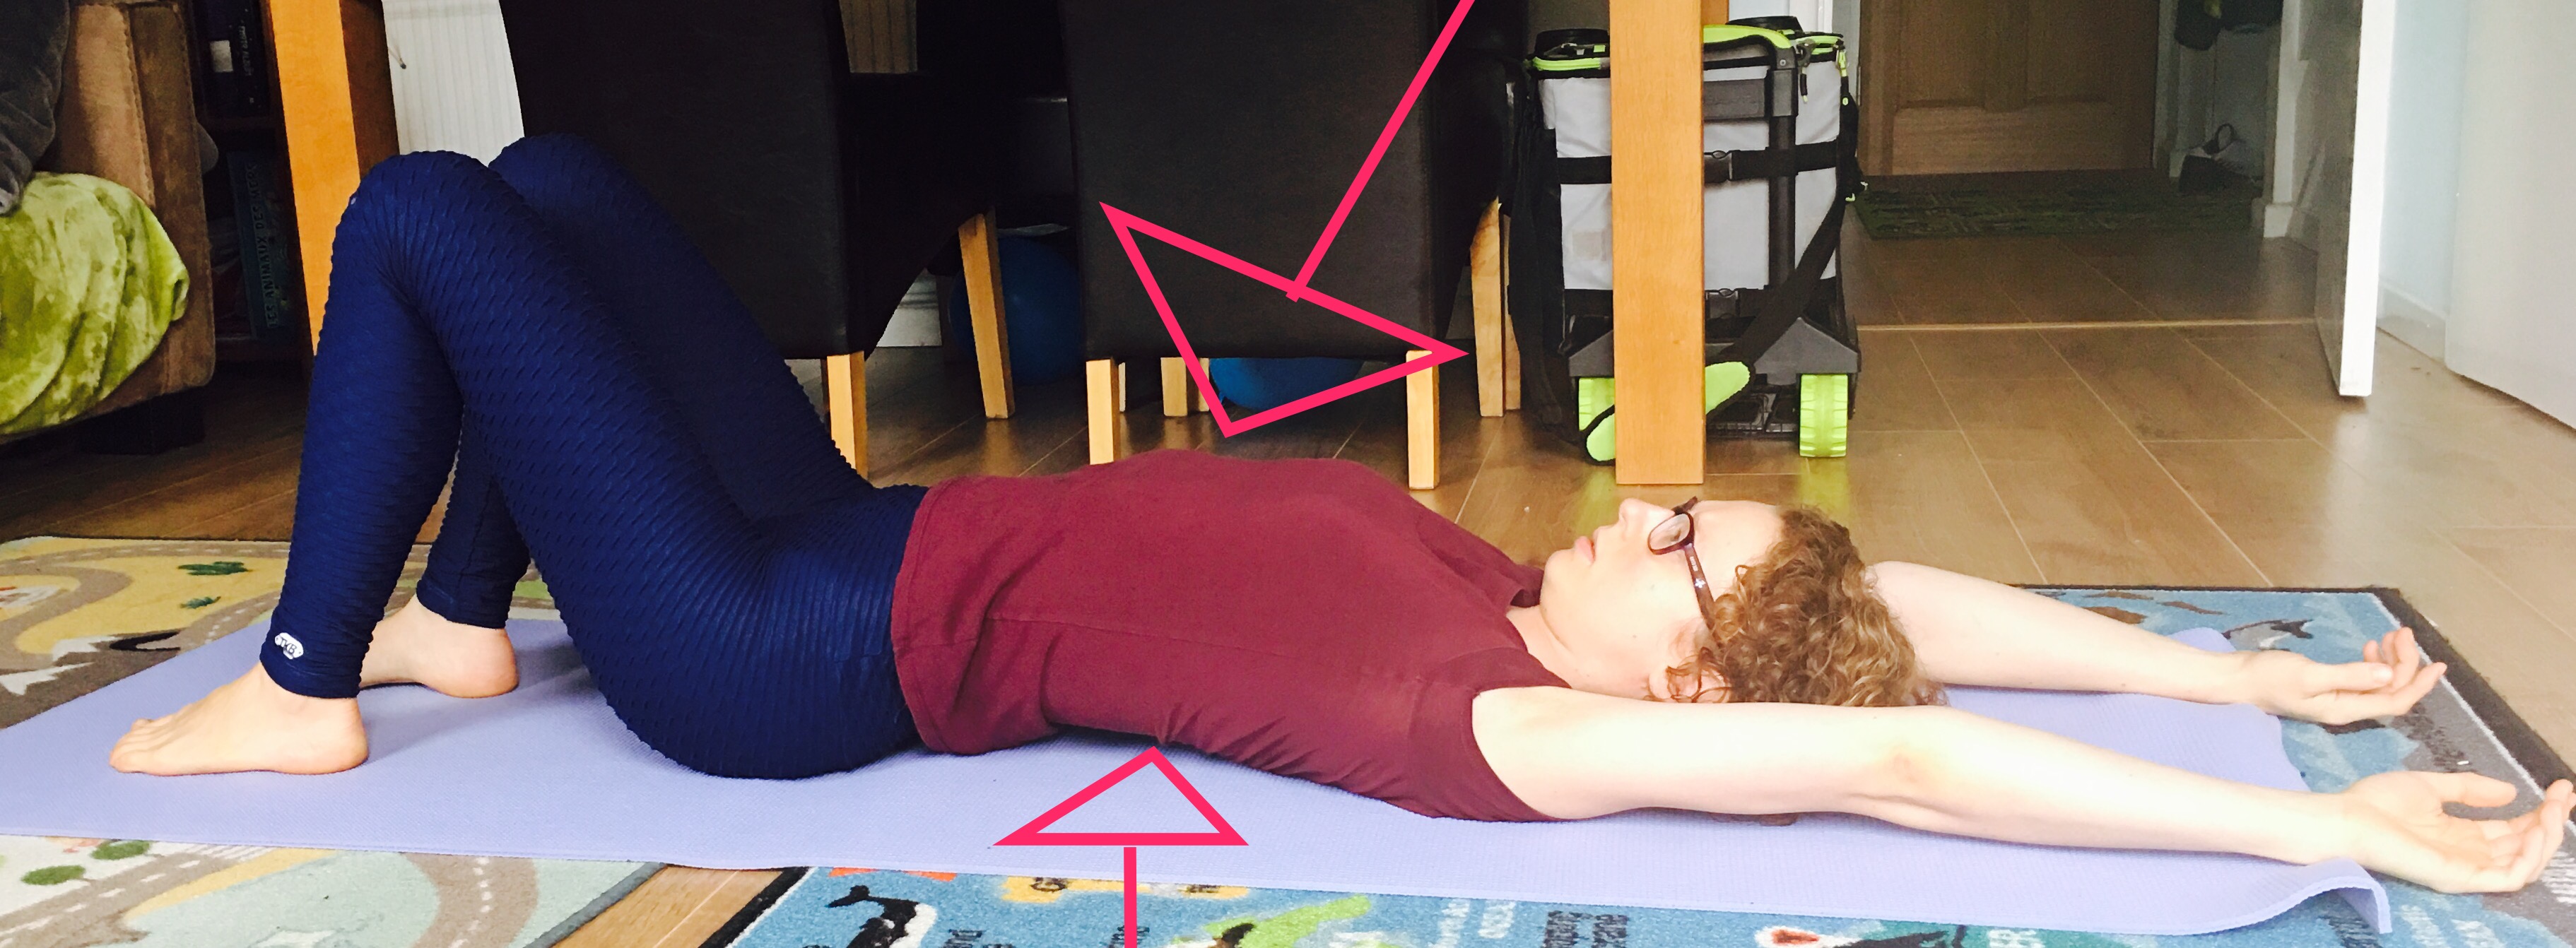
Does your back arch and ribs flare out (as I nicely demonstrate and highlight with my snazzy editing skills)? If so then there’s a good chance that when you swim and reach in front, you’re doing this too.

If you engage your core can you lift your arms without arching your back (again demonstrated by me below- my ribs have dropped down and my back has a gentle curve,rather than a larger arch)?

swimming postnatal engage core

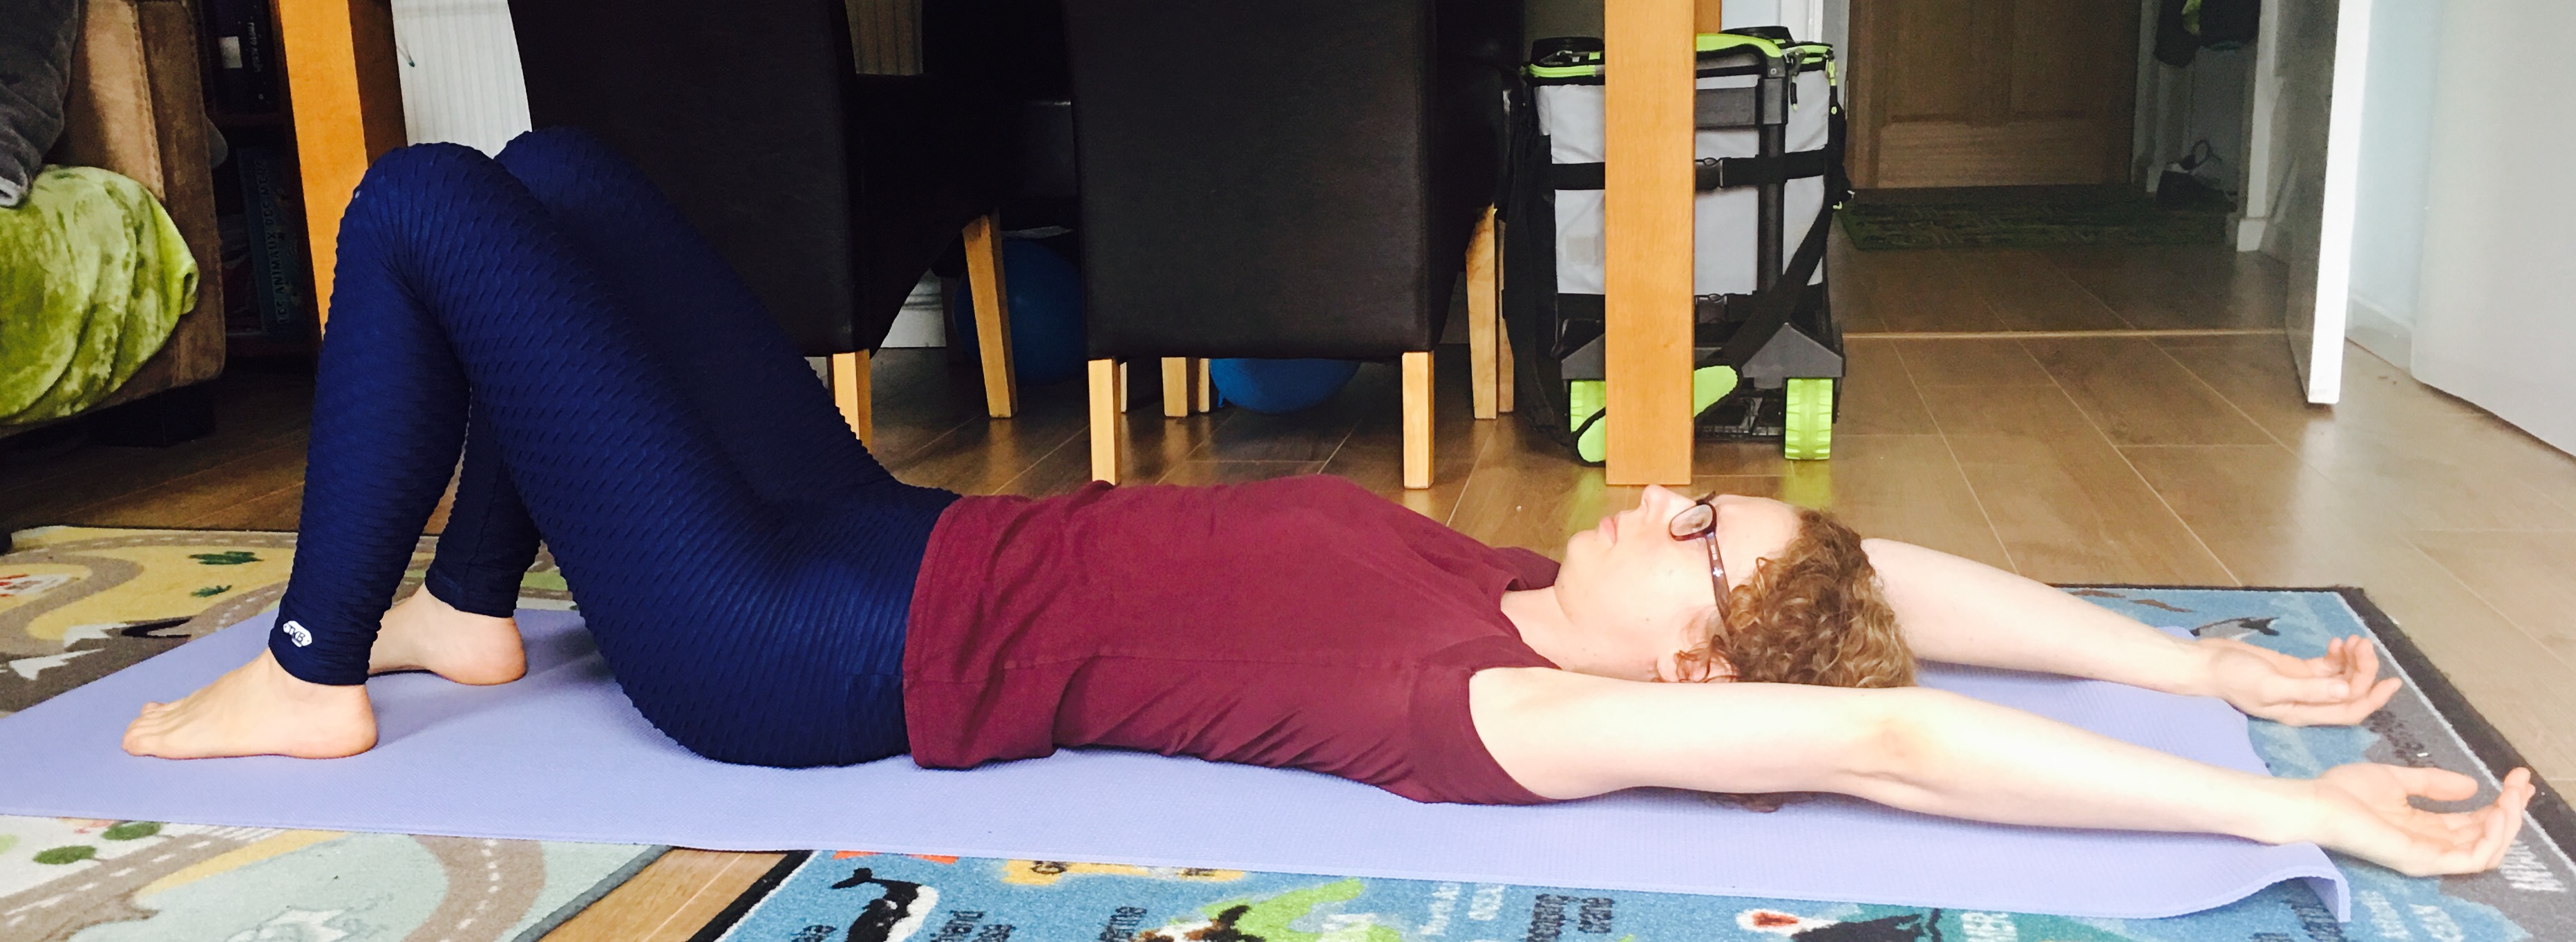
You need to engage your core to do this. Be honest with yourself, can you do this while you’re swimming? You might be better off working on increasing your core control before you get back in the pool.

The other thing that might be in issue is shoulder mobility. If your arms won’t fully reach up or flop to the side, you may need to increase your flexibility in that area first too.

postnatal swimming watford personal trainer

Breathing

No breath holding (this applies to pregnancy too). When your head is under water exhale, then inhale when out. Holding your breath places pressure on the core and floor.

Core Connection

If you’ve done some postnatal core training and can engage your deep core and breathe diaphragmatically, then that really will help. Personally I would work on that postnatally before getting in the pool. This way you’re controlling your core, controlling your spine and rib position, and minimising any pressure on your diastasis.
Swimming is a very repetitive movement, and you don’t want to be doing it in a way that repeatedly puts pressure on a tummy that needs to heal.

The Take Home

Swimming isn’t necessarily bad for diastasis, but it depends on your technique!

Ultimately, if you feel swimming makes you feel a bit human again, gives you some time out, and you feel better for it, then GO FOR IT!

BUT, if you have a large diastasis, or one that isn’t healing, maybe consider this could be a factor. Think about your technique, and it might be that you need to take a break for a bit whilst you work on restoring it.

1

Have you got an aching upper back?

I seem to be seeing this quite a bit with clients at the moment, and a common cause is slouching, which granted most of us are guilty of, but feeding a baby seems to make it so much worse! I’m wondering if ‘baby-feeding back’ can become a thing, like ‘tennis-elbow’?

So a massage will help, right?

Yes and no. Yes in that absolutely, when you have a collection of knots between your shoulder blades that could earn you a Scouts badge, a good massage feels glorious.

But this can be short term, because it hasn’t addressed the cause of your soreness.

What is the cause?

I’ve already mentioned poor posture when feeding, slouching or hunched over baby. And there’s a chance it’s not just when feeding. Next time you’re in a queue or waiting for the kettle to boil, pay attention to how you’re standing: have you let your shoulders slump forwards?

Do you find yourself standing like the figure on the left or the right?

If you spend too much time sitting or standing with rounded shoulders, your chest is in a shortened, tight position, and your back is stretched. This stretch on the back muscles mean they become tense, fighting this pull and developing sore knots.

Massaging these tights spots will help make you feel and move better in the short term, so keep doing that, but your chest needs releasing and lengthening to stop that strain on your back. Even better, strengthening your back will really help you to maintain better alignment and prevent the ache from returning. Here’s how.

1. Hand to Wall Chest Stretch

This is a lovely chest release, and targets down the arm and wrist too, which can get tight from all the lifting mums do! Do one arm, then before the second do some arms circles to compare how your arms feel. Does the side you’ve released feel a lot looser?

You may want to release your shoulders too, as I find a lot of cients have tension here. A stretch or some self-massage are fine, just keep the stretch gentle and hold it long enough that you feel the muscle has released (you can compare the stretched side to the other like above, to make sure it’s worked). No need to use your hand even, just tilt your head to one side.

2. Wall Angel.

A simple exercise you can do anywhere, the wall angel is great for strengthening your upper back.

Stand with your feet 3-4 inches from the wall, and there should be a gentle curve in your low back. When you raise your arms to the wall maintain that cureve- if you feel your back arch then gently engage your tummy muscles to maintain your posture.

Once your arms are up, try to relax your shoulders, rather than allowing them to hunch. For the vast majority of people just holding this position is enough, not need to slide your arms up yet. Start with 30 seconds.

While there try to keep your breathing sow and controlled, with your ribs opening up to the sides.

Doing the hand to wall stretch before the wall angel helps to make the wall angel easier. Both together only takes a couple of minutes so you can do them 2-3 times a day.

3. Remove the Cause!

Finally,you need to remove what’s causing your back to ache, in this case poor feeding habits! Try supporting your back and baby with cushions when feeding so you can sit more upright, and if you’re bottle feeding try changing which side you feed from too.

Of course there can be other reasons for an aching, including how you hold baby, previous injuries or conditions. Core strength can also play a big part, and I’d always recommend a restorative postnatal exercise programme. And remember, if you have any severe pain, especially in the spine itself (I’m just talking about musclular aches in this blog) then see a therapist.

If you have any questions about anything in this blog you can find me, along with other pregnancy and postnatal professionals, in this Facebook support group. We’ll be happy to answer any questions.

“What’s the best exercise for toning my tummy?”

I probably get asked this question more than any other. Which is understandable- I remember how weak I felt in the months after giving birth, and looking down at a tummy that didn’t look like mine anymore!

Your postnatal core isn’t the same as your pre-pregnancy core. For a start it’s about 10x more amazing because it’s just grown a baby. So let’s give it the love it deserves!

Which means not rushing things for a start. The pressure to ‘bounce’ back can be immense, and I don’t just mean physically. Emotionally it takes time too, to adapt to your new role as mummy, yet new mums are up and about so quickly.

And this can affect how well you core recovers. Nutrition, rest, stress, all of this helps early healing. Check out how new mums get treated in some cultures!

But when you are ready to start exercising it can feel like there’s a huge list of what not to do, and not much guidance on what you can do! The go-to exercises for ab toning, like crunches, are no good, and running shouldn’t be rushed.

There are SO many fantastic exercises you CAN do though! Here are 5 here to get you started.


Just remember that these are for progressively strengthening your core. I always work on breathing technique with postnatal clients before any exercises- it’s vital you get this right to get the most from them, especially if you have diastasis recti.

And when it comes to that postnatal bulge, it could be a case of weakened muscles that need gradually strengthening, but if there’s a layer of fat on top then you’ll need to look at your nutrition, and I always recommend walking for postnatal clients too (it’s massively underrated).

1. Heel Slides

These are great for the early postnatal period when you’re just returning to exercise. It’s about finding and connecting to your deep core muscles, (not your abs) as you stabilise your pelvis while applying a very gentle load to your core. Building this base is the first step towards a more toned tummy.

There are a few variations on this exercise, and for some clients, including those with a larger diastasis, I give a slightly different version to this where you keep your heel on the floor and exhale through the entire exercise, however for most of my postnatal clients this is the one we start with.

2. Bridge

Love this one! For many ‘core’ means ‘abs’ or six pack, but the core, as well as including muscles much deeper than the abs, is about all the muscles around it too, and how well they function as a team.

So here we’re hitting the low back AND the butt, which work together. Plus, if you nail the breathing you’ve got the deep core involved too.

Again there are variations, but here I’ve added a ‘squeeze’ with a pilates ball to give the pelvic floor some extra work.

3. Straight Arm Pulldown

Love this one too! Since we spend the vast majority of our days upright, it makes sense to do some exercises that way! This is another one that I use in the early postnatal period for connecting to the deep core muscles and perfect for moving from the mat to standing work. It applies a gentle load to the core, which means enough to stimulate tissue regeneration and help heal diastasis without overdoing it and making it worse.

Really try to focus on the exhale, and getting a good 360 expansion (read this blog if that doesn’t make sense) on the inhale. Alignment is really important too- ribs over pelvis, no arching the back or thrusting your hips forwards here!

4. Half-Kneeling Push

So this is a fantastic exercise when it comes to getting ‘bang for your buck’. When you’re short on time (as most mums are!) this works the core and the chest, triceps and the split stance engages your legs and butt as they stabilise your pelvis.

With your shoulders relaxed, and wrist, elbow and shoulder level, your push forwards and exhale. The pressure of the band pulling you backwards engages your core, and you can add a twist which mimics how we tend to actually use our core: pushing a door open, playing tennis or boxing for example, we twist.

I wouldn’t start with the twist, but build to it. However this can be adapted to suit nearly any level, by adjusting the resistance from the band. You can keep it incredibly light so as not to create too much pressure (which we don’t want when you first return to exercise after baby) and focus on the deep core connection, then build to a much stronger band to really tighten the muscles around your waist.

5. Birddog

This is such an amazing core exercise (when done properly). It works your entire torso and pelvis as you use your butt when you straighten your legs AND your upper back and shoulders to stabilise your arm and shoulder blade!

PLUS the ability to co-ordinate your opposite arm and leg (like when you walk or run) is a really important movement pattern. There’s a reason we learn to crawl before we walk- it develops the necessary co-ordination, stability and strength. So this is becoming quite a trendy exercise- check out this Washington Post article about how crawling is the new plank!

Unfortunately I see this done badly a LOT. Remember to keep it SLOW and straighten your leg from your hip using your butt muscles, NOT arching your lower back (although yeah I’m sure it does look more sexy in an Insta post). Also try to avoid shifting your weight side to side too much. This gets easier with practise as it requires using your core more, but the pole on my back in the video is to demonstrate alignment and gives me feedback so I can feel any weight shift or postural changes.

This really is deceptively hard though and NOT one I use on clients with a very large or soft diastasis- the pulldowns, bridges and heel slides are a better place to start, then progress to this.

For more advice download my 10 Tips for getting back in shape after having a baby.

Disclaimer: consult with a medical professional before making any changes to your exercise routine, especially if you haven’t done any restorative postnatal work- be sensible about what you attempt! See full disclaimer here. If you’re unsure whether any of these are suitable then please see a postnatal qualified instructor or a Women’s Health Physio, or comment below and I’ll do my best to help.


postnatal fitness workouts

I’m often short on time. My clients are often short on time. So being able to create a workout that makes the most of the little time we have is a basic requirement for me!

So I’m going to share with you the basic template I use to create most of my programmes. It’s simple, has the potential for loads of variety, and gives you ‘bang for your buck’ in terms of what you get out of each exercise. Basically, you’re maximising the little time you do have.

How?

Because the 4 moves cover your whole body. They use big movements, which means more muscles involved, more work done in a shorter space of time, and more calories burned.

It’s suitable for any goal.

The variety I said you can get from this means that you can tweak it to suit fat loss, improving strength, work up a sweat doing some cardio: all you need is some imagination! You can use it at the gym, or at home with no equipment.

And even when I’m creating a longer workout, these 4 exercises usually make the base of that workout, and I build from there, adding some extra moves in.

So what are the 4 moves?

  • Lower Body Push
  • Lower Body Pull
  • Upper Body Push
  • Upper Body Pull

What exactly does that mean?!

An exercise using either a pulling or a pushing action. (I’m hoping the upper/ lower body part makes sense!)

So an example that is suitable for postnatal clients (click the exercise name to see a video demo):

  • Squat (lower body push, pretty much always a squat variation, of which there are LOADS!)
  • Bridge (lower body pull- generally speaking if it makes your butt burn then it’s a lower body pull.)
  • Wall Press Up (upper body push- works your chest)
  • Wall Angel (upper body pull- works your back)

As you can see, the pushes and pulls work opposite sides of your body.

Do 10-12 reps (or 30-60 seconds for the wall angel) and complete it as a circuit, 3-4 times. That’s about 15 minutes, and for really time-pressed clients, they can do 1 circuit every time they get a spare 5 minutes (this one’s low intensity, so I don’t worry about a warm up like I would on harder workouts).

I want to get a bit sweaty and feel like I’ve had a workout.

Let’s take the same postnatal template, and tweak it.

All you do is head to the park, complete the circuit then add a power/ hill walk before the next circuit. If you have a baby in a buggy, trust me, this is hard.

This is suitable for when you’re postnatal or pregnant (even with diastasis recti, although then it would be unloaded and you’d need to be assessed to check you’re controlling the exercise ok) , but because these exercises are slightly harder technique-wise it’s not one I usually start clients on.  Because you’re adding resistance here it can be challenging for any level- just add or remove some weight! If you want some more postnatal core exercises you can read this blog though.

I’m not postnatal and want to push myself even harder.

Great. So many options for you! I’m going to throw some equipment in, but basic stuff you can buy to use at home.

The caveat here is that you do need to be taught to perform the swing. This is an ADVANCED option that I use, but I’ve included to show you just how hard this workout can get, especially if you have a little equipment (and all of these moves can be made harder still)!

For this one I quite like to break it down into a superset. I use these a lot with clients and on the Restore My Core programme. A superset is 2 exercises, and you go back and forth between them. So exercise 1a and 1b you go back and forth 3 times, then the same for 2a and 2b.

Obviously with the more intense workouts you need to throw in a suitable warm up and cool down before and after, but I really hope this gives you an idea of how easily you can create a workout, and how you don’t have to spend hours in the gym to improve your fitness.

Disclaimer: consult with a medical professional before making any changes to your exercise routine, especially if you haven’t done any restorative postnatal work- be sensible about what you attempt! See full disclaimer here.

7

I’ve written before about returning to exercise post C-section, but I didn’t touch on one important area of C-section recovery: the scar. Because I think this deserves a blog of its own.

I meet a lot of C-section mamas, and issues such as poor sensation/numbness, ongoing pain and a feeling of tightness in the area are common. Which is hardly surprising: even from a small cut I’ve felt tightness in the area as it’s healed.

But this rarely gets talked about- why not?! There’s been trauma to muscles, nerves, blood vessels, right in the hugely important area of the abdomen no less. Your core muscles (we want those functioning well, right?) and a number of organs are potentially affected by this. And massage can make a huge difference to the healing process.

So why aren’t all C-section mamas told to massage their scars as part of their recovery?


Advice is all about the appearance of the scar, such as looking for signs of infection, yet the effects of your C-section can go beyond what you feel in the scar itself.

This may sound severe, but remember the scar is far deeper than what we can see: if you think about how deep the incisions are, and how scar tissue is formed, this isn’t surprising.

After surgery scar tissue forms as part of the healing process, but the fibres go in all different directions, can feel tighter, and it can adhere to other tissues, such as skin, muscles and even organs. This is when problems can occur.

You can view a video here of what these adhesions look like.

So what issues can arise?

Low Back and Pelvic Pain

Adhesions in this area can affect the sacrum, which is where your spine meets your pelvis, so anything that interferes with its movement or function can have a knock on affect to your low back too.

Frequent urination

I think this one is self-explanatory! You should be urinating every 2-5 hours, but many women find themselves having to dash to the toilet far more often. Again adhesions in the area can affect the bladder’s expansion and sensitivity, interfering with normal function.

Pain with intercourse

This comes back to adhesions around the organs again: if it limits their movement, then they can’t get out of the way during intercourse, which can be very painful.

Obviously not every woman who’s had a C-section will experience these symptoms. But it’s worth knowing about because sometimes it can be years before any issues occur, as adhesions continue to form. And while massage won’t prevent all of this, it can definitely reduce the risk and severity of symptoms should they occur. So you’ve got nothing to lose from trying it!

So how do I massage my scar?

When to start:

Ideally as soon as it’s fully healed to prevent the formation of deeper adhesions. But it’s never too late to start, even years later!

How often:

More regularly to start, when the tissues might not be moving very freely, but once they are it’s still a good idea to revisit it once every so often, in case it’s getting tight again.

If you have difficulties doing this or notice your tissues don’t seem to be responding to your efforts, then you should see a Women’s Health Physiotherapist for treatment.

How?

This is the best video I’ve seen of how to massage your scar, by Lynne Schulte at Intuitive Hands PT.

However there are also therapists who specialises in scar tissue massage. Emma Holly from ScarWork at Restore Therapy told me about a recent client and how scar massage helped her:

After a long labour she ended up with an emergency c-section. After a few months she started to try some exercise videos and found she had bladder weakness and sought out an amazing women’s health physiotherapist and has started a course of exercise to strengthen her pelvic floor.

Her c-section scar had left her with little feeling and a disconnect with the pelvic area. She came to me for treatment where I worked along the scar tissue, using ScarWork therapy to stimulate further healing. Deep stretches loosened some adhesions caused by surgery and using massage to release the pelvis and hips post pregnancy.

After one 45 minute session she walked out of the appointment and said “oh, my hips feel different” in the days that followed she noticed her feeling of the pelvic floor improved so she could be more aware when drawing up the muscles and is now finding her exercises from the physiotherapist and in restorative pilates much easier.”

In addition, if you are having any issues with pelvic pain, or that might be associated with adhesions to your organs (including bowel problems) many Women’s Health Physios are trained in visceral manipulation, so can assess you and work deeper than you might be comfortable doing yourself.

WH Physio Becky Aston explains how this can affect breathing patterns (read this blog for more on the breath and core strength) and result in pain elsewhere:


An amazing fact about the diapraghm (muscle below the lungs) is it moves up and down 20,000 times a day. We think of the ovaries, kidneys, liver, pancreas etc just existing in our pelvic and abdominal cavity but they move in a synchronised fashion with the diaphragm.

Now imagine that you have something restricting this movement i.e. adhesions from a scar. However small, they will limit this movement and other structures will have to accommodate. This can cause pain or dysfunction anywhere else in the body.

Releasing abdominal adhesions can relieve IBS symptoms, menstrual pain, back pain, help the pelvic floor muscle and deep core work more effectively and many more things.

Visceral release work is a gentle therapy with mobilises visceral and myofascial structures which can release those adhesions and allow the body to be synchronised again.

And finally…

A note on numbness and loss of sensation in scars, as this is what I most commonly get asked about.

Nerve damage can be permanent, but nerves do regenerate. The speed of this is slow though, about a mm a day (it depends a bit on the size of the nerve in question) so it can take months and even years to regain feeling. The same goes for feeling such as tingling or itchiness.

I find that the impact of a scar can reach far beyond its immediate area. Tight quad muscles (on the front of the thighs) for example can pull on the scar, so massage and release work here can be beneficial to the C-section mama. And any scar can have a huge impact on muscle function too.

If you’re interested in booking a postnatal massage with me to help with your recovery, and with your scar massage, you can find out more about what it involves here.

And if you’re one of the many women who finds the thought of touching your scar makes you feel ill, you’re not alone. The comments I received after first writing this blog prompted me to write a second about scar aversion. You can read it here.


7
1

I’ll cut to the chase: most of us suck at walking.

In her book Move Your DNA Katy Bowman describes walking as “controlled falling”, in that most of us simply fall from one foot to the next, rather than focusing on using our butt muscles to drive us forwards.

I’ve written about the benefits of walking, and more importantly how much we should be aiming to do, but now it’s time to make sure you get maximum ‘bang for your buck’ from your walks.

Here are some simple stretches, exercises and changes you can make to your walking technique to ensure you’re actually using your glutes when you’re out and about!

Release Tight Hips

Too much time sitting means tight hips. When we sit our legs are lifted in front of us, and these muscles at the front of the hips can get tight. This means when we walk and we want our legs pushing off behind us, the tightness at the front can restrict that.

Here’s a simple test to see if you have enough mobility for your bum to effectively pull your leg back.

Lie face down on the floor. When your pelvis is neutral (which is where it should be) then your pubic bone and the two most prominent, forward boney points on the side of each pelvis should all be level. So when you lie down you should feel an equal pressure on all 3 points.

You should feel your pubic bone pressing into the floor, and if you look down from where it's labelled 'iliac crest' to where it ends, you should feel the 2 bony points on either side there too.

You should feel your pubic bone pressing into the floor, and if you look down from where it’s labelled ‘iliac crest’ to where it ends, you should feel the 2 bony points on either side there too.

Keep your head down, and lift one leg off the floor, using your glute muscles. How high can you lift your leg? Does the pressure on these 3 boney points remain the same or does your pubic bone lift up? Do you have to work your stomach muscles to keep it down?

Ideally you want to be able to lift your leg behind your body without having to work to keep your pelvis level. If you do, then when you walk you’re likely to compensate for this tightness by arching the lower back instead.

Stretch your hip as in the video below. Make sure you keep a neutral pelvis- squeeze your glute to almost tuck your bum under, and make sure you stay upright, rather than leaning forward. Raising your arm to bend slightly takes the stretch a little deeper. Hold for 30 seconds, or until the stretch eases off.

Strengthen Your Glutes

Follow this with some exercises to strengthen your glutes. This blog includes some simple exercises to help build strength for running, and they are equally useful for walking.

Go Minimal!

Your choice of footwear has a huge impact on how you walk. As this picture shows even a small heel can alter your whole body’s alignment. This means joints getting more wear and tear and muscles not working at their best.

heels walking alignment

So a flat shoe is advisable, with a flexible sole because reduced foot movement will also affect how your muscles are loaded. However if you’re used to wearing more supportive shoes please transition slowly, to give your muscles time to adapt; the book Whole Body Barefoot is all about transitioning to minimalist footwear. And if you wear orthotics or have any joint problems please consult your physio/ osteopath/ chiropractor for advice.

Vary Your Terrain

So much of our walking is on flat artificial surfaces. Including a variety of gradients in your walk challenges your muscles in different ways. For example walking uphill requires more flexibility in your calf muscles, and works your glutes more, and the variety means less repetitive strain on your body.

Uneven terrain is good too, especially if you’re in minimal shoes. Walking over lumps and bumps is good for the feet and more challenging to the body than a flat surface, meaning a better workout!

barefoot walking

Uneven terrain and barefoot- mega workout for her legs here!

Get off the treadmill

When you’re on a treadmill the belt carries your foot back for you, reducing the work for your butt muscles and increasing the work for the muscles at the front of your hip, which have to pull your leg forwards. This is the opposite of what we want, especially if you’ve spent too much time sitting at a desk or in a car!

If you do have to use a treadmill, make sure it is on an incline of at least 1%, to force you to push off a little and challenge the glutes.

And regardless of where you are, try to walk through the whole foot with a smooth rolling movement. Keep your head over your shoulders, rather than projecting it forwards (or looking down at a phone), and your arms should have a smooth swing, pushing back more than forwards.

For more specific exercises to help improve your flexibility, strength and posture, find out more about personal training.

1